AD8232 ECG Heart Rate Monitor Kit
Professional-Grade Biopotential Measurement for Arduino and Medical Applications
Introduction
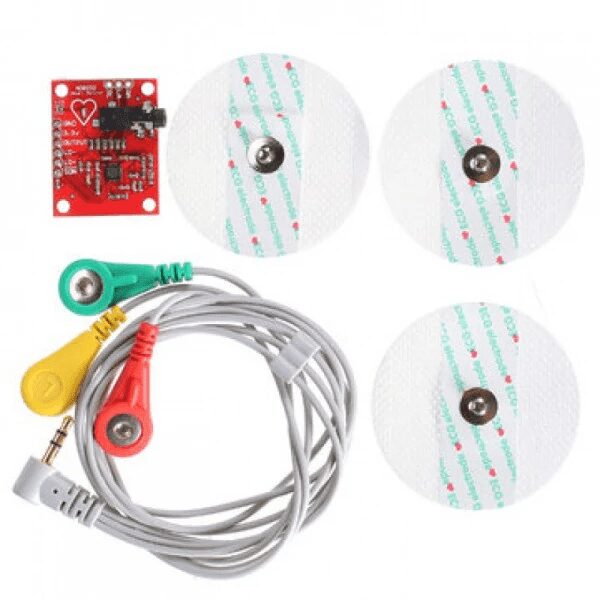
The AD8232 ECG Sensor Module is a compact board that measures electrical activity of the heart. This single-lead ECG front end is designed for portable, low-power applications and works perfectly with Arduino for heart rate monitoring projects.
Key Features
Medical Grade
Single-lead ECG monitoring
High Precision
Integrated signal conditioning
Low Power
170μA typical current consumption
Lead-Off Detection
Built-in electrode contact monitoring
Technical Specifications
| Input Range | ±1.5mV to ±100mV |
|---|---|
| Bandwidth | 0.5Hz to 40Hz |
| Gain | 100 V/V (adjustable) |
| Supply Voltage | 3.0V to 5.5V |
| Output Type | Analog (ECG signal) + Digital (LO+/LO-) |
| Electrodes | 3x Snap-on (RA, LA, RL) |
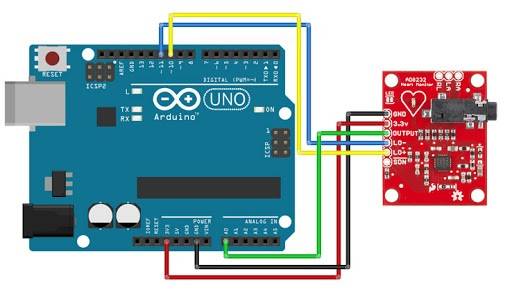
Pin Configuration
| Pin | Label | Description | Arduino Connection |
|---|---|---|---|
| 1 | 3.3V | Power (3.3V recommended) | 3.3V |
| 2 | GND | Ground | GND |
| 3 | OUTPUT | ECG Analog Output | A0 |
| 4 | LO+ | Lead-Off Detect Positive | D11 (Digital Input) |
| 5 | LO- | Lead-Off Detect Negative | D10(Digital Input) |
| 6 | SDN | Shutdown Control | D4 (Optional) |
Important: Proper electrode placement is crucial for accurate readings
Electrode Placement
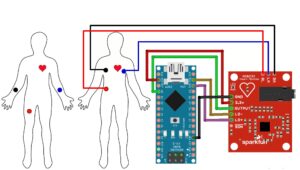
Standard Lead I Configuration:
- RA (Right Arm): Right side of chest
- LA (Left Arm): Left side of chest
- RL (Right Leg): Ground reference
For best results, clean skin and use conductive gel
Basic ECG Monitoring
// AD8232 ECG Basic Monitoring
const int ecgPin = A0;
const int loPlus = 2;
const int loMinus = 3;

void setup() {
  Serial.begin(9600);
  pinMode(loPlus, INPUT);
  pinMode(loMinus, INPUT);
}

void loop() {
  if((digitalRead(loPlus) == 1 || (digitalRead(loMinus) == 1)){
    Serial.println("Electrode disconnected!");
  }
  else {
    int ecgValue = analogRead(ecgPin);
    Serial.println(ecgValue);
  }
  delay(10);
}
Processing Visualization: Use Serial Plotter or Processing IDE for ECG waveform display
Advanced Features
Heart Rate Calculation
// Detect R-peaks and calculate BPM
unsigned long lastBeat = 0;
float threshold = 520; // Adjust based on signal
float bpm = 0;

if(ecgValue > threshold && millis() > lastBeat + 200){
  bpm = 60000 / (millis() - lastBeat);
  lastBeat = millis();
  Serial.print("BPM: "); Serial.println(bpm);
}
Signal Filtering
// Simple moving average filter
#define FILTER_SIZE 5
int filterBuffer[FILTER_SIZE];
int filterIndex = 0;
int filteredValue = 0;

filterBuffer[filterIndex] = ecgValue;
filterIndex = (filterIndex + 1) % FILTER_SIZE;
for(int i=0; i<FILTER_SIZE; i++){
  filteredValue += filterBuffer[i];
}
filteredValue /= FILTER_SIZE;
SD Card Logging
// Log ECG data to SD card
#include
#include

File ecgFile;

void setup(){
  SD.begin(4); // CS pin
  ecgFile = SD.open("ecg.csv", FILE_WRITE);
}

void loop(){
  ecgFile.print(millis());
  ecgFile.print(",");
  ecgFile.println(ecgValue);
}
Bluetooth Streaming
// Stream ECG via Bluetooth
#include

SoftwareSerial btSerial(10, 11); // RX, TX

void setup(){
  btSerial.begin(9600);
}

void loop(){
  btSerial.println(ecgValue);
  delay(10);
}
Troubleshooting
Noisy Signal
- Ensure proper electrode contact
- Keep away from power cables
- Add RC low-pass filter (10kΩ + 0.1μF)
Flatline Reading
- Check electrode connections
- Verify power supply (3.3V recommended)
- Test with different electrode positions
False Alarms
- Adjust detection threshold
- Implement software debouncing
- Check for muscle movement artifacts
Related Posts
IC 74173 – 4-Bit D-Type Register with 3-State Outputs
IC 74173 - 4-Bit D-Type Register with 3-State Outputs
TTL Quad D Flip-Flop with Asynchronous Clear and Output ...
DIY Metal Detector Kit
DIY Metal Detector Kit
DC 3V-5V Non-Contact Sensor Module with 60mm Detection Range
Introduc...
CNC V3 Shield with 4 A4988 Drivers
CNC V3 Shield with 4 A4988 Drivers
Complete Arduino-compatible CNC controller for 3D printers and mi...
CN3791 12V MPPT Solar Charger Module
CN3791 12V MPPT Solar Charger Module
Maximum Power Point Tracking Solar Charge Controller for Lead-Acid/Lithiu...
CJMCU-TRRS 3.5mm Jack AV Stereo Module
CJMCU-TRRS 3.5mm Jack AV Stereo Module
Compact breakout board for audio/video signal interfacing with TRRS con...
TTP223 Capacitive Touch Sensor Module (Red)
TTP223 Capacitive Touch Sensor Module (Red)
Single-Key Touch Detection with Digital Output for Arduino and DIY...
Capacitive Soil Moisture Sensor
Capacitive Soil Moisture Sensor
Corrosion-Resistant Humidity Detection for Plants and Agricultural Application...
VHM-314 Bluetooth Audio Receiver Board Module
VHM-314 Bluetooth Audio Receiver Board Module
High-fidelity stereo audio receiver with Bluetooth 5.0 and 3.5mm...
BD243 DIY Mini Tesla Coil Prototyping Kit
BD243 DIY Mini Tesla Coil Prototyping Kit
High-Voltage Wireless Power Demonstration - Build Your Own Spark Gap...
BF120-3AA Precision Strain Gauges (120Ω)
BF120-3AA Precision Strain Gauges (120Ω)
High-precision foil strain gauges for load cell applications with 120...
AI Thinker ESP32-CAM Development Board
AI Thinker ESP32-CAM Development Board
WiFi + Bluetooth with OV2640 Camera Module - Arduino Compatib...

Recent Comments