
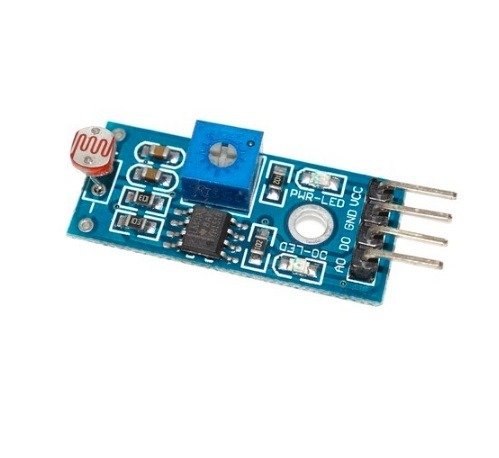
4-Pin Light-Dependent Photosensitive Sensor (LDR) Module
Ambient Light Detection for Arduino and DIY Electronics
Introduction
The 4-Pin LDR Module is a light-sensitive sensor that detects ambient light intensity using a photoresistor. This module provides both digital and analog outputs, making it ideal for automatic lighting systems, weather stations, and smart home applications.
Key Features
Light Sensing
Detects visible light spectrum (400-700nm)
Dual Output
Digital (TTL) and Analog signals
Adjustable
Sensitivity potentiometer
Simple Interface
4-pin connection (VCC, GND, DO, AO)
Technical Specifications
| Operating Voltage | 3.3V – 5V DC |
|---|---|
| Resistance Range | 200Ω (light) – 20MΩ (dark) |
| Response Time | ≈20ms (rise), ≈30ms (fall) |
| Spectral Peak | 540nm (green light) |
| Output Signals | Digital (TTL) + Analog |
| Dimensions | 32mm × 14mm |
Pin Configuration
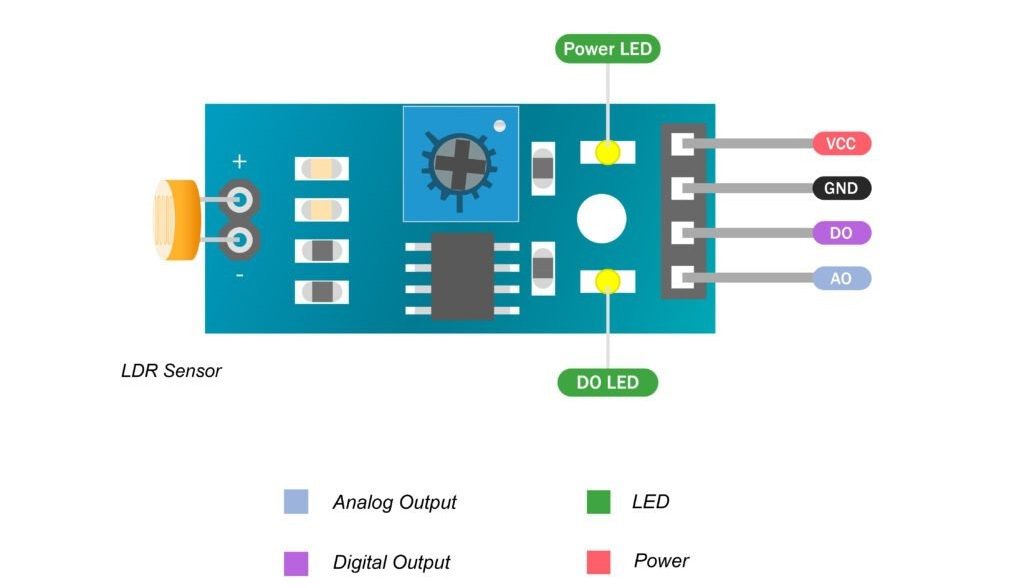
| Pin | Label | Description | Arduino Connection |
|---|---|---|---|
| 1 | VCC | Power (3.3V-5V) | 5V |
| 2 | GND | Ground | GND |
| 3 | DO | Digital Output | Digital Pin |
| 4 | AO | Analog Output | Analog Pin |
Note: The module includes a sensitivity adjustment potentiometer (clockwise increases sensitivity)
Wiring with Arduino
// Basic Connections:
// VCC → 5V
// GND → GND
// DO  → D2 (Digital Input)
// AO  → A0 (Analog Input)

// For best results, position sensor away from direct light sources
Important: Avoid exposing the LDR to strong light sources (>100,000 lux) for extended periods
Basic Digital Detection
// Digital Output Example
const int ldrDigital = 2;

void setup() {
  pinMode(ldrDigital, INPUT);
  Serial.begin(9600);
}

void loop() {
  if (digitalRead(ldrDigital) == LOW) {
    Serial.println("Bright light detected!");
    // Add your response code here
  }
  delay(100);
}
Analog Light Measurement
// Analog Output Example
const int ldrAnalog = A0;

void setup() {
  Serial.begin(9600);
}

void loop() {
  int lightValue = analogRead(ldrAnalog);
  Serial.print("Light level: ");
  Serial.println(lightValue);

  if (lightValue < 300) {  // Adjust threshold as needed
    Serial.println("Dark environment detected");
  }
  delay(200);
}
Advanced Applications
Auto-Calibration
// Automatic baseline calibration
int baseline = 0;

void calibrate() {
  for(int i=0; i<10; i++) {
    baseline += analogRead(A0);
    delay(100);
  }
  baseline /= 10;
  Serial.print("Calibrated baseline: ");
  Serial.println(baseline);
}
Lux Calculation
// Approximate lux calculation
float calculateLux(int rawValue) {
  // Calibration values needed for accuracy
  float voltage = rawValue * (5.0 / 1023.0);
  return pow(10, (voltage - 1.0) / 0.5); // Example conversion
}
Smart Lighting
// Automatic light control
void controlLED(int lightLevel) {
  if(lightLevel < 300) {
    digitalWrite(LED_PIN, HIGH);
  } else {
    digitalWrite(LED_PIN, LOW);
  }
}
Data Logging
// Light level monitoring
void logLightLevel() {
  int light = analogRead(A0);
  Serial.print(millis()/1000);
  Serial.print(",");
  Serial.println(light);
  delay(60000); // Log every minute
}
Troubleshooting
No Response to Light
- Adjust sensitivity potentiometer clockwise
- Check wiring connections
- Verify sufficient light source
Constant Trigger
- Reduce sensitivity (turn CCW)
- Check for ambient light interference
- Increase detection threshold in code
Inconsistent Readings
- Ensure stable power supply
- Check for loose connections
- Implement software smoothing
Related Posts
MG90S Mini Digital 180° Servo
MG90S Mini Digital 180° Servo
Metal Gear, 2.2kg·cm Torque for RC and Robotics
Introduction
...
XKC-Y25-V Non-Contact Water Liquid Level Sensor
XKC-Y25-V Non-Contact Water Liquid Level Sensor
Capacitive Detection Without Physical Contact
...
Waterproof Ultrasonic Obstacle Sensor, Sensor with Separate Probe
+
Waterproof Ultrasonic Obstacle Sensor
Distance Measurement with Separate Waterproof Probe
...
Water Level Depth Detection Sensor
Water Level Depth Detection Sensor
Liquid Measurement for Arduino and IoT Projects
Introduct...
VL53L0X Purple Laser Distance Sensor Module
VL53L0X Laser Distance Sensor Module
High-Speed, High-Precision Time-of-Flight Distance Measurement
...
TCS34725 RGB Color Sensor Module
TCS34725 RGB Color Sensor Module
High-Accuracy Digital Color Detection with IR Filter
Introd...
TCS3200 Color Sensor Module
TCS3200 Color Sensor Module
Precise RGB Color Detection for Arduino and Embedded Projects
In...
PN532 NFC RFID Read/Write Module V3 Kit
PN532 NFC RFID Read/Write Module V3 Kit
Advanced Near Field Communication for Arduino and Embedded Systems
...
HC-SR501 PIR Motion Sensor Module
HC-SR501 PIR Motion Sensor Module
Passive Infrared Detection for Security and Automation Projects
Flex Sensor 5.6 cm (Detect Bending Motion)
Flex Sensor 5.6cm
Bend Detection Sensor for Arduino and Wearable Electronics Projects
...
ACS712 Current Sensor Module
ACS712 5A Current Sensor Module
Hall-Effect Based AC/DC Current Measurement for Arduino Projects

AS608 Optical Fingerprint Sensor Module
AS608 Optical Fingerprint Sensor Module
High-Precision Biometric Recognition for Arduino and Microcontroller P...

Recent Comments